TM 1-1520-240-10
2-14-7
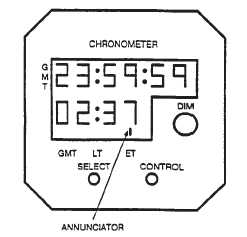
2-14-21. CHRONOMETER.
Two digital clocks labeled CHRONOMETER are located
on the copilot and pilot instrument panels (fig. 2-14-4).
Each clock has a six-digit GMT (greenwich mean time)
display and four-digit selectable display. A test mode is
provided to check system. A flashing annunciator identi-
fies which clock mode has been selected. There are
three controls on each clock, a SELECT button, a CON-
TROL button, and a DIM switch.
Figure 2-14-4. Chronometer
a.
SELECT Button. It allows the selection of any of
three modes on the four-digit display: GMT, LT (local
time), or ET (elapsed time). The six-digit display shows
GMT only.
b.
CONTROL Button. It is used to set the time se-
lected on the four-digit display. When the CONTROL and
SELECT buttons are pressed simultaneously, the four-
digit display is changed from the normal to the time set
mode, and the CONTROL button is functional.
c.
DIM Control Switch. It is used to set the light
intensity of the display. At low light settings, the clock
display is NVG compatible.
Integral alkaline batteries maintain clock operation when
no aircraft power is applied, but the CONTROL and SE-
LECT buttons are disabled. Power to operate the chro-
nometers is supplied by the DC essential bus through the
CPLT CLOCK and PLT CLOCK on the No. 1 PDP and
No. 2 PDP.
2-14-22. Normal Operation - CHRONOMETER.
2-14-23. Setting GMT.
Press the SELECT button until GMT is selected. Simulta-
neously press both the SELECT and CONTROL buttons
to enter the set mode. The tens of hours digit will start
flashing and the CONTROL button has full control of the
flashing digit. Each time the CONTROL button is pressed
, the flashing digit will increment. Once the tenth of hours
is set, pressing the SELECT button will select the next
digit to be set. After the last digit has been selected and
set with the CONTROL button, press the SELECT button
to exit the set mode. The annunciator will resume its
normal flashing condition to indicate that the GMT clock
is running.
2-14-24. Setting LT.
Press the SELECT button until LT is selected. Simulta-
neously press both the SELECT and CONTROL buttons
to enter the set mode. The tens of hours digit will start
flashing and CONTROL button has full control of the
flashing digit. Use the same sequence as for setting GMT
with the exception that the minutes are already synchro-
nized with the GMT clock and can not be set when in LT
mode.
2-14-25. Setting ET.
The elapsed time allows for count up or count down
modes.
a.
Count Up. Press the SELECT button until ET is
selected. Press the CONTROL button to start count up
sequence. The clock will count up to 59 minutes, 59
seconds and then changes to hours and minutes. It will
count up to 99 hours and 59 minutes. Pressing the CON-
TROL button again resets the ET to zero.
b.
Count Down. Press the SELECT button until ET
is selected. Simultaneously press both SELECT and
CONTROL buttons to enter the set mode. A count down
from any time, not to exceed 59 minutes and 59 seconds,
can be set using the same sequence as for setting GMT.
Once the last digit is set, pressing the SELECT button
exits the set mode and the clock is ready to start count
down. Pressing the CONTROL button will start count
down sequence. When the clock reaches zero, an alarm
becomes active by flashing the numbers and the ET
counter will begin to count up. To reset the alarm press
either the SELECT or CONTROL button.
2-14-26. Test Mode.
To activate the test mode, press and hold the SELECT
button for three seconds and all numerical displays will
show an 8 and all annunciators will be active.
2-14-27. Master Caution System.
The master caution system provides the pilots with a
visual indication of helicopter conditions or faults (fig.
2-14-5 and 2-14-6). The components of the systems are
the 712 Master Caution Panel with NVG filter, 714A
Master Caution/Advisory Panel, two MASTER CAU-
TION lights with NVG filters, and a CAUTION LT panel
with a TEST and BRT-DIM switch. Power to operate and
control the master caution system is supplied by the DC
essential bus through the LIGHTING CAUTION PN cir-
cuit breaker on the No. 1 PDP.